Tag Archives: wood lathe for sale

Cutting Mortises 17th-century Style (That is, by Hand) – Lost Art Press

Cutting Mortises 17th-century Style (That is, by Hand) – Lost Art Press

Fig 4.1 Discover ways to chop mortises correctly and successfully and also you’ll be capable to construct maximum anything else. Joint stools provides you with a variety of follow – there are 16 joints in every one.

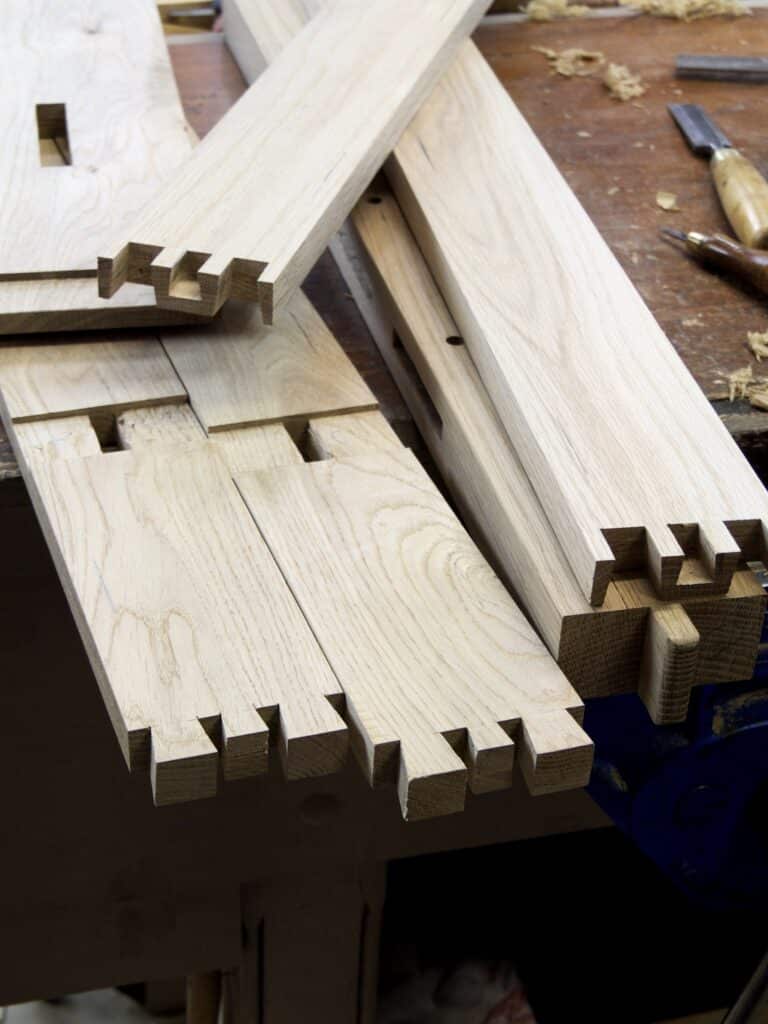
The next is excerpted from Bankruptcy 4 of “Make a Joint Stool from a Tree,” by Jennie Alexander and Peter Follansbee.

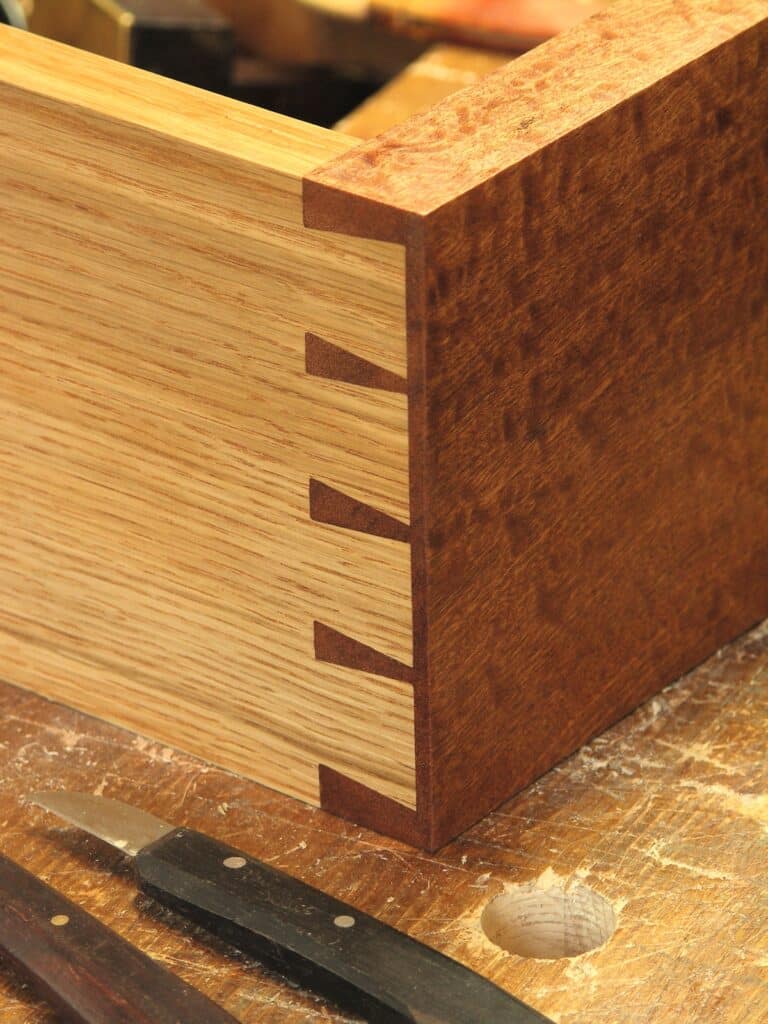
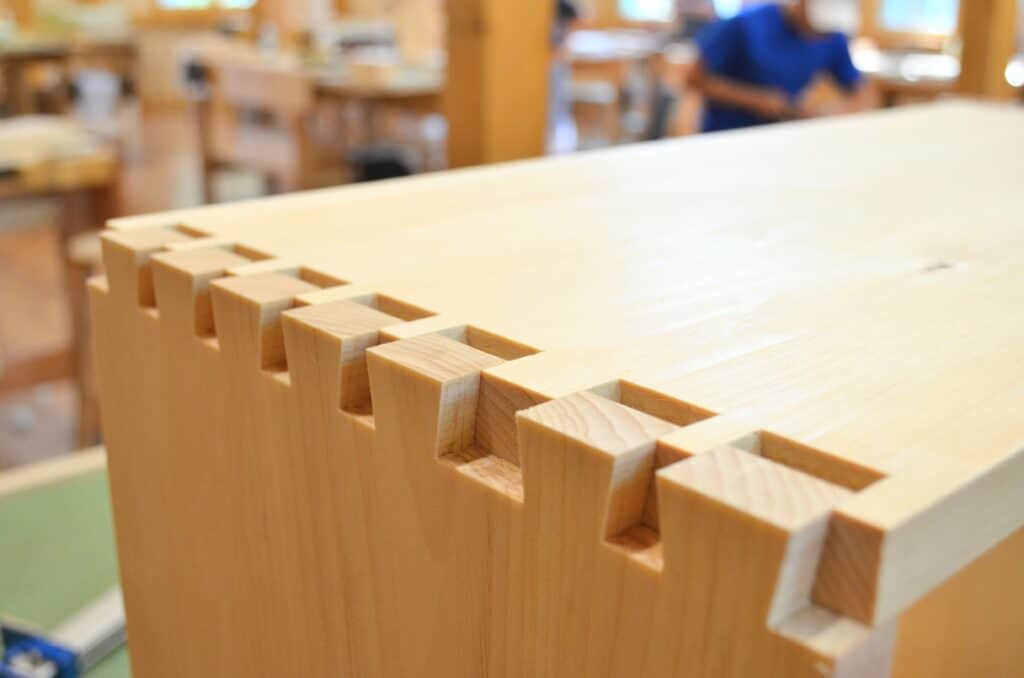
Joint stools are an enchanting piece of British and early American furnishings. Constituted of riven – no longer sawn – oak, their legs are normally became and angled. The aprons and stretchers are joined to the legs the use of drawbored mortise-and-tenon joints, no glue. And the seat is pegged to the body beneath. On account of those traits, the stools are a very good advent to the next abilities.

• Selecting the best equipment: Lots of the equipment of the seventeenth century are very similar to fashionable hand equipment – you simply want fewer of them. “Make a Joint Stool from a Tree” introduces you to the very elementary equipment you want to start out.

• Processing inexperienced oak: Cut up an oak the use of easy equipment, rive the bolts into usable inventory and dry it to a workable moisture content material.

• Joinery and mouldings: Discover ways to lower mortises and tenons by hand, together with the methods to verify a good are compatible on the shoulder of the joint. Make mouldings the use of shop-made scratch shares – no moulding planes required.

• Turning: Regardless that some joint stools have been adorned with easy chamfers and chisel-cut main points, many have been became. Be informed the handful of equipment and strikes you want to show period-appropriate main points.

• Drawboring: Joint stools are unusually sturdy articles of furnishings. Why? The drawbored mortise-and-tenon joint. This mechanical joint isn’t utilized in recent furnishings. Alexander and Follansbee carry the veil in this method and show the stairs to verify your joint stool will final 400 years or so.

• Completing: Many joint stools have been completed in the beginning with paint. You’ll be able to make your personal the use of pigments and linseed oil. The best end provides a translucent glow that no gallon of latex can ever supply.

Now we will go back to the framing portions, beginning with the stiles. Step one is to put out the mortises. We’ll define those steps separately as a result of it could possibly get complicated. We can name the mortises for the entrance and rear rails “instantly” mortises, the ones for the canted ends of the stool we can name “angled” mortises.

Stack the 4 stiles in combination, with their beveled within corners touching, and with radial faces up.

Those radial faces turn out to be the “entrance” and “again” faces of the stool. Take one stile, and paintings on its radial face.

Fig. 4.2 This tale stick is every other instance of one thing for which we lack era proof; however its effectiveness can’t be beat. Along with serving because the essential structure reference, it purposes as a picket pocket book. If you are making various other stool patterns, mark them with the date.

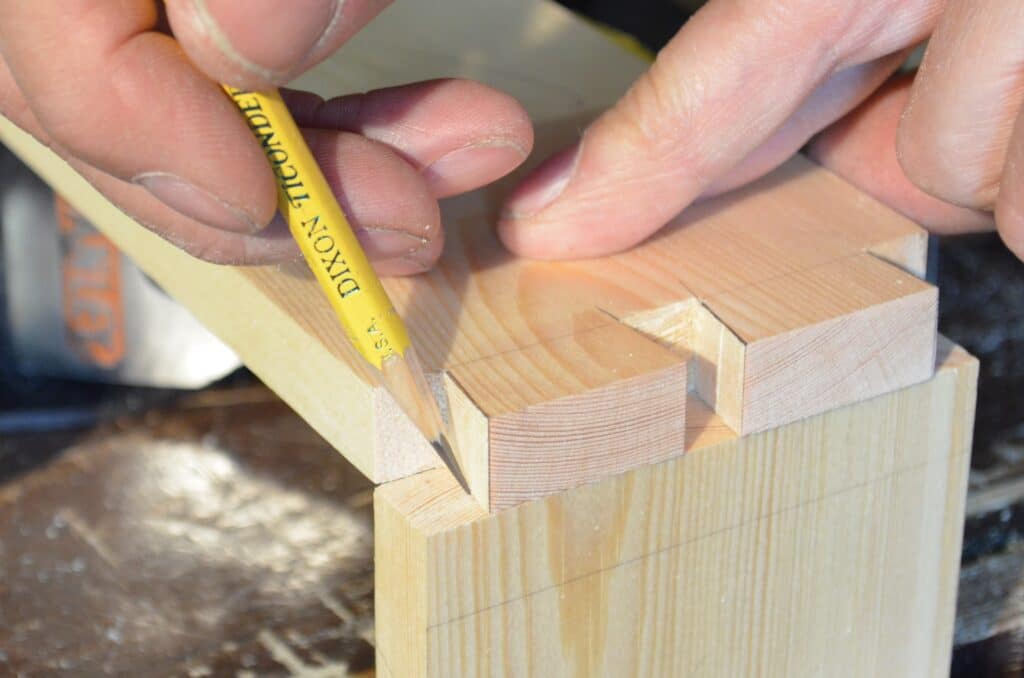
To put out the stiles’ sq. blocks and the instantly mortises, it’s more uncomplicated to make use of what a wood worker now calls a “tale stick” this is marked with the stiles’ main points, somewhat than operating from paper drawings or patterns. This shop-made stick data the markings which are then transferred to the stile. We’ve got made those sticks to report other stools. The places and heights of the squared blocks, turning main points and positions of mortises can all be taken from the keep on with the stile. It’s best to mark ONE stile from the stick, then the opposite 3 stiles from that first stile.

Ensure the foot of the stile is trimmed sq.. Line up the foot of the tale stick and the ft of the stile. With an axe, mark the boundaries of the sq. blocks and scribe those marks throughout all 4 faces of the stile, with one exception – the highest of the stile is marked most effective at the radial face and the corresponding within tangential face (the place the instantly apron mortise is situated).

Now line the stick up at the within face and mark the places of the mortises in this tangential face.

Fig. 4.3 Prick the issues with the axe, then scribe them with the sq. and axe. Sharpen the axe with a document every so often. Cautious, it could possibly draw blood when it’s sharp.

Something to bear in mind is that the highest of the apron mortise isn’t on the identical top as the highest of the stile. This mortise drops down about 3/4″ from the stile’s best finish. Eyeball the highest of the apron mortise and scribe it with the axe and sq..

The next move is to mark the mortises with the mortise gauge. To set the gauge, make a mark along with your chisel’s edge perpendicular to, however proper in opposition to the stile’s arris. Subsequent, transfer over one chisel width and endure down exhausting sufficient to make a mark within the wooden. Then set the pins of your mortise gauge consistent with the site of this 2nd chisel mark. The result’s a mortise this is set in from the face of the inventory the thickness of the chisel. Our mortises are most often 5/16″, set in from the face 5/16″. This spacing is in accordance with research of era paintings; 5/16″ is sort of a usual from what we’ve observed.

Fig. 4.4 (left) This can be a method that if we heard it someplace, we’ve forgotten the place. It really works rather well. No ruler, no fidgeting with the gauge up in opposition to the chisel’s sharp edge. Mark the bushes with the chisel, then put the chisel down. Very secure and easy. Fig. 4.5 (proper) Now transfer the chisel over one chisel-width. And lean on it. Now your environment is marked at the bushes, and also you simply wish to set the mortise gauge consistent with the chisel marks.
Fig. 4.6 The use of each arms on a marking or mortise gauge may appear to be overkill, however the oak may be very fibrous, and when it’s inexperienced it could possibly catch the gauge’s pins. The end result can also be abnormal and it’s exhausting to re-mark a line as soon as it is going off target. Lengthen the marking traces past the highest and backside of the mortise; this manner you’ll test the spacing of the joint should you in finding you want to reset your gauge – if, as an example, it falls at the flooring.


The Angled Mortises
To seek out the site for the angled aspect mortises, use an adjustable bevel set to the required flare perspective. A slope of one:6 is what we’ve used on a number of stools. Our research of 17th-century stools display flare angles proper round that determine, some much less, none extra. To set the bevel, set a straightedge on a framing sq., positioning it at 1″ on one leg, and six″ at the different. Then regulate the bevel to this perspective and lock its nut to protected the environment. You’ll be able to then scribe this perspective on a work of wooden, and even scribe it at the wall. Just like the adjustable gauges, the bevel can lose its environment if bumped. Having the perspective scribed someplace makes it simple to reset it. Alexander became an adjustable bevel into a hard and fast one by threading a bolt via its inventory and blade.

To put out the aspect mortises, you should lift the road that designates the highest of the stool from the entrance radial face around the aspect tangential face. Set the bevel with its care for at the entrance face of the stile. Line it up with the marked best of the stool, with its angled blade pointing upwards at the different out of doors face of that stile. Scribe this line with the axe.

Fig. 4.7 (left) Here’s an adjustable bevel, and the changed one Alexander become a hard and fast bevel. If you’re the use of one flare perspective frequently, that is find out how to move. It’s simple sufficient to get a hold of an additional adjustable bevel. Fig. 4.8 (proper) Marking this perspective is equal to any structure; a pair gentle passes will in moderation scribe a line at the stile. We’ve got continuously joked that this step calls for two consecutive ideas. It could be 3.

Then use a sq. to hold this line around the different within face. So the collection is sq., bevel, sq.. Take into account that it’s highest to hold the traces around the out of doors faces; the interior faces are unreliable. This structure is each easy and complex on the identical time. Occasionally it is helping to face the stile up and tilt it as it’ll be within the completed stool. Then you’ll simply visualize the place the angled mortises are and the way they stand up upper than the instantly mortises.

You’ll be able to repeat this procedure for the highest fringe of the stretchers’ mortises. Or you’ll mark this from the tale stick, this time lining up the highest of the stool with the scribed line that designates the highest of the aspect apron.

Now mark the mortises’ top and width on those faces of the stile. After you mark out two stiles, lay them aspect by aspect and test that they agree. A entrance or rear pair will have to have their radial faces matching, with the instantly mortises aiming at every different, and the aspect, angled mortises emerging up towards the highest of the stool.

Mortising
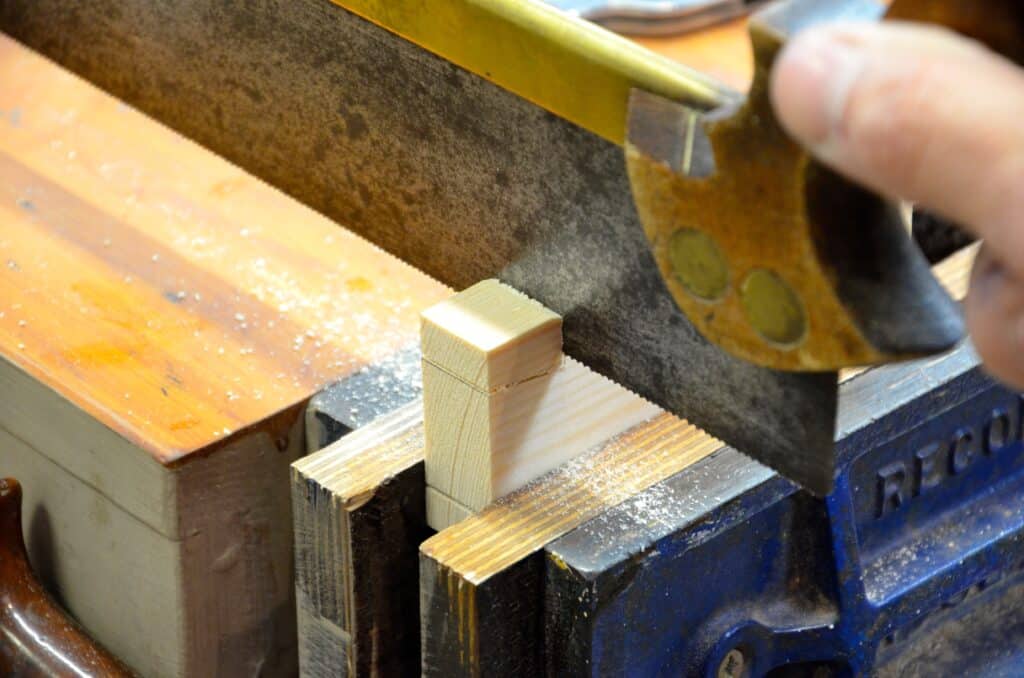
After you have struck the structure of the mortises, protected the stile at the benchtop close to its edge. Shove one finish of the stile in opposition to the bench hook then protected the stile with the holdfast.

Fig. 4.9 (left) That is the primary pair of blows with the mortise chisel. Word the chisel’s bevel is with regards to plumb. Fig. 4.10 (proper) Right here, the stile is held in position by a holdfast, with a scrap of pine between the holdfast’s “pad” and the stile. This prevents bruising the inventory.

Start mortising by maintaining the mortise chisel with the care for tilted clear of you, leaving its bevel with regards to plumb. Place the primary cuts with the mortise chisel about within the middle of the mortise’s period. A blow from the picket mallet drives the chisel downward. Flip the chisel round, and make every other chop aimed on the first. The result’s a V-shaped opening on the center of the mortise’s period. Trade the chisel’s place on this method, enlarging the V-shaped lower; the purpose is to achieve the intensity on the middle of the mortise as temporarily as imaginable. Then the remainder of the paintings is simply chopping down the top grain to elongate the mortise. As you get to the ends of the mortise, carry the chisel upright in order that its again floor is perpendicular to the stile’s floor.

Fig. 4.11 (left) Coming on the mortise first this manner, then that method calls for some shift in posture. Experiment with other see what feels highest. The speculation is to get the mortise chopped temporarily and simply. Fig. 4.12 (proper) The volume of labor this is break up between hand drive and mallet-driven will range. Moisture content material performs a task on this; drier inventory is much less forgiving with hand drive. However both method, oak will persuade you to make use of your entire frame.

There are a couple of stances and postures we use that build up the potency in mortising. For many of the paintings the chisel is pushed with a mallet, however once in a while hand drive comes in handy as neatly. When the use of hand drive, it is helping should you upward thrust onto the balls of your ft and are available down with your entire frame to force the chisel. Lean at the best of the chisel care for with the entrance of your shoulder to lend a hand force the device into the wooden. Then you’ll pry the waste up from the ground of the mortise. In fig. 4.12, the left hand is used to place the chisel, and the fitting hand and higher frame are using the device into the wooden.

It’s vital to stay the mortise chisel parallel to the face of the stile. You’ll be able to sight in opposition to a sq. situated at the benchtop. Power the chisel into the mortise, then step again and sight it in opposition to the blade of the sq.. With follow you’re going to learn how to sight this in opposition to the face of the stile, and no longer want the sq..

Fig. 4.13 A pleasing stout mortise chisel is very important when prying the fabric out of the mortise.

The moisture content material of the oak is essential at this level; most often it’s reasonably rainy within whilst you chop those joints. The inventory within the footage used to be planed rainy from the log not up to a month prior to chopping those joints. The straight-grained nature of the riven inventory makes mortising more uncomplicated than ever. The similar rules that practice to splitting practice right here as neatly. In impact the chisel is getting into the wooden at once on both the radial or tangential aircraft.

Chop the mortise to a intensity of about 1-1/2″. It’s very best to get that intensity on the center of the mortise; on the ends it calls for a bit of extra consideration. There’s a tendency to pry in opposition to the top grain of the mortise – this may bruise and warp the wooden there. Steer clear of the general ends of the mortise to start with, that method you’ll pry in opposition to the top grain that can finally end up as waste. End up by taking cuts instantly down the top grain with the again of the chisel perpendicular to the stile.

Fig. 4.14 (best) Right here, the mortise’s backside is ragged, however it doesn’t wish to be a lot cleaner than this. The tenon won’t ever achieve that a ways. Fig. 4.15 (backside) This photograph and the former one have been shot between a work of oak and a pane of plate glass. This permits a cross-section view of a chisel chopping a mortise. This experiment used to be relatively useful in working out what is going on throughout the mortising procedure. Because of Roy Underhill for educating us this method.

To get the final bits out on the backside of the mortise’s ends, chop instantly down into the ends, then flip the chisel round, and with the bevel down, force the chisel into the midst of the mortise, and are available towards the ends. Now carry up the chip at the again of the chisel.

The power of the center line

The power of the center line

Like anything else in woodworking (and existence), there are lots of tactics to do a definite activity. Laying out joinery isn’t any exception. The equipment and strategies I take advantage of in large part rely on whether or not I’m running with hand equipment or power equipment. With hand equipment, every joint must be totally laid out in order that I’ve traces to paintings to. In the case of power equipment, oftentimes I simplest wish to lay out one joint and use it to set fences and intensity stops. On the other hand, there’s one methodology I take advantage of that spans each hand- and power-tool joinery, and that’s the center line.

When chopping joinery with hand equipment, the center line is my leaping off level. I can lay out the center, then figure out from that line to create the joinery. The maximum not unusual case for that is the mortise-and-tenon joint. Once in a while the center line doesn’t confer with the center of an element however fairly the center of the joinery—take into consideration a desk leg connecting to an apron. The tenon is ceaselessly targeted on the apron and the mortise is offset, in most cases to the out of doors of the leg to create a desired expose. In both case, I can get started with a line that marks the center of the joint. As soon as I’ve that line I will use a mortise chisel to do the relaxation of the format. Through centering the mortise chisel on the center line and frivolously hanging, I will see how huge the mortise will probably be and will then mark in the different traces in line with that.

When the usage of a router to create a mortise, it may be even more uncomplicated. I strike a center line, line up the center of the bit, set the fence to the edge, and I’m in a position to head. A tricky section can also be lining up with the center line. Some of my routers have the center line marked on the base in a pair of places, which makes it simple. The router in the image didn’t have any center traces so I needed to create them. Fortunately the activity is moderately simple.

I began by way of laying out a center line on a board. I put in an reasonably priced (sub $10) instrument referred to as a center-finding pin into the router. Subsequent I used the router fence to creep up on the line with the pin. As soon as positioned and locked in, I took a marking knife and made a mark on the polycarbonate router base. I then used a small sq. to hold that line up the base. Final, I switched to a effective marker to mark on the steel section of the base.

Now putting in the router to a center line is straightforward as can also be. Line up the line on the base with the format line, deliver the fence as much as the edge, lock it in, set your intensity, and lower your joint. That is a lot sooner than attempting to make use of the aspect of a instantly bit or the usage of the center-finding pin each and every time.

In some ways, I’d be misplaced with out my center traces when woodworking. I take advantage of them for nearly each and every format activity that I’ve. This is only one instance of how neatly they paintings. With slightly of idea, I’m positive that it is advisable to get a hold of different situations the place the center line can be the option to pass. I’m no longer suggesting that that is the highest option to lay out and lower joinery, it’s merely the approach I’ve come to do it. So if in case you have by no means used the center line, give it check out!


Sensational People – Paul Sellers’ Blog

Sensational People – Paul Sellers’ Blog

Sensational other folks weren’t exhibitionists however bizarre employees making. There used to be no appearing and no faking.

I have in mind looking at George make a dovetailed nook to a cutlery tray with divisions for every form of consuming enforce the use of sycamore offcuts saved after our making draining forums for a faculty’s business kitchen. Each and every transfer used to be planned, unwavering, extremely direct. A dovetail temporarily shaped become template for the pins. The pencil got here to sharpness from the chisel’s edge two times to put down pristine strains black on white with the sunshine fineness that become unordinary. Again then I recall him squaring the ends of skinny picket with out assistance from a taking pictures board the use of simplest the briefest glimpse and glancing placement of a sq. on my own. The ends gleamed underneath the fluorescent lighting fixtures as he twisted and grew to become them out and in of his Report fast-free up vise after which got here the faucet faucet faucet of his Warrington hammer because the dovetailed nook seated one piece to the opposite. This development of running, suits coming directly from the noticed, hermetic joints totally gapless, taught me in a question of 2 mins find out how to lower dovetails. I by no means used every other way as a question in fact. Pins first appeared backwards and illogical and I by no means resorted to substitutes for ability.

No measurements and no perspective guides or templates used. All distances measured simplest via eye and angles set via hand and eye on my own. Search for two mins and it’s obtrusive. That is the signature of a person-maker losing now not even a 2d in his making.

He handed the following nook to me and I stood transfixed in a stare eying every piece result in incredulity. He anticipated me to copy what he’d simply proven me without a phrases of clarification. His gently guffawing as he handed me the dovetail template instructed me this will not be as simple as he made it glance and he had now not used it on his nook however then he stated, “No ruler regardless that.”

From time to time a pencil line works higher than a knife and different instances the knife’s pristine lower portions the waste from the sought after. Part-laps are more straightforward than thru or not unusual dovetails however individuals are frequently intimidated via them.

The noticed appeared heavy in my hand one way or the other despite the fact that I used to be now the use of it day-to-day. All of it associated with the thickness of the picket, the dimensions of the paintings and the connection between the noticed to the strains. Nowadays, I watch for grains via understanding their fibrous innards. What? Internally I grade woods via my reference of a long time of enjoy. On a scale of 1 to 10 oaks come someplace between 8-10 while maple comes mid to decrease and plenty of unique woods are available in at one to 2. Ebonies are a cast mass the place grain can every now and then appear non-existent. Select up an outdated bowling inexperienced bowling ball and you’ll perceive what I imply. Oak then again will likely be part or lower than part that weight. Gaboon ebony, very endangered, weighs in at 70lbs in keeping with cubic foot whilst crimson oak is 45lbs a cubic foot. Again then I had no phrases of reference. Woods had been all of the identical — pores, hardness, density and such supposed little or no to me. My sycamore felt rather comfortable and light-weight (34lbs in keeping with cubic foot) but if the noticed entered the picket it appeared one way or the other to be gripping the noticed plate.

A undeniable pine field makes a light-weight and inexperienced casket for burial. That is the best way I’ve made coffins for buddies departed over the years. It’s a small approach of celebrating the lived lifetime of buddies.

I had positioned the strains via copying George’s, more or less. They seemed proper, spaced calmly. And two dovetails are more straightforward to visualize spacings for than 3. The width of my picket used to be 2 1/2″ (63mm). 7/8″ (23mm) dovetails gave me 1/4″ (6mm) pins, close to sufficient.

No pencil sharpener betters the chisel for buying the purpose throughout.

My noticed didn’t float as George’s had, slipping into and thru every lower kerf as easily and without problems as all the time. The perimeters of my dovetails seemed somewhat jagged as every stroke left its ragged hint of even the slightest of wobbles. I will’t have in mind whether or not I used to be aware of this or whether or not the proof got here when the 2 portions had been married. George’s even hand, frequently powered thru with some distance fewer strokes than mine. After which there used to be the slicing. Hmm! Knifewalls weren’t known as knifewalls then. I created the time period to have the phrase describe what used to be being created with the knife: Marking knife appeared so insufficient and extra apt for bushes-framing and basic carpentry. I’m happy that I had the foresight — putting knife used to be the similar. I’m certain George could be stunned via the place I’m now, 58 years to the week later. Blogger, influencer, knifewall. Such phrases didn’t exist again then and neither did any of the social media and even the time period exist both.

My antique noticed simply helps to keep slicing my dovetails. I sharpen all of my saws to activity so my couple of dovetail saws have slightly any set and the plate rides tight as much as the knifewalls

Strangely, my dovetails did come in combination and held. I did two and George did two and the foreman, Jack, came around and took a have a look at them. Taking his glasses from his brow he seemed excessive of the darkish tortoiseshell rims and smiled. “Now not dangerous, now not dangerous!” he stated, nodding. “They’ll be higher subsequent time. Do it once more!” he stated. And I did.

Hounds-teeth dovetails upload a lot energy throughout the dovetails and had been lower because of this on my own and now not for adornment. Abnormal for the bizarre.

Within the mesmerising global of YouTube, we frequently see the bizarre sensationalised via one thing speeded up via time-lapsed, virtually rapid videography. Cuts and edits come virtually straight away at knowledgeable fingertips dancing throughout a keyboard. It’s simple to fail to remember that handwork talents will have to be evolved via rote follow and that it’s going to take time and repeat processes to know the complexities of quite a lot of picket sorts, how the equipment paintings with them after which our humanness on the subject of the whole lot. Normally, few folks personal professional and bizarre paintings directly from the primary check out. To possess it we will have to disclose ourselves to our personal weaknesses. Such a lot of instances I’ve observed the most obvious grow to be complicated when my hand, my arm, my eye and my frame appeared incapable of doing what I felt used to be utterly comprehensible. The bizarre now unseen in maximum crafts owned via the bizarre guy and lady appear to me all of the extra bizarre now that I’m an outdated guy. 200 years have handed for the reason that guy and the lady warped the loom, spun the yarn and wove the material. George and Jack, the bizarre, confirmed me the easier approach of persistence and ability in order that I may just in reality personal all that I would wish for sixty years of constructing and promoting and dwelling an approach to life of constructing all that I beloved within the making of items picket. It’s the bizarre that reserve the best as bizarre other folks to be recognised.

Red Oak Seven-stick Comb-back Chair – Lost Art Press

Red Oak Seven-stick Comb-back Chair – Lost Art Press

This seven-stick comb-back chair used to be constructed the use of pink oak all through my most up-to-date chairmaking elegance. It’s being presented at a bargain on account of a pair small beauty problems (which the general public is not going to understand).

This chair is one in every of my more moderen designs, which makes use of a four-piece arm (for steadiness) and a skinny shoe, which streamlines the glance by way of putting off visible bulk from the arm. It additionally is among the maximum comfy chairs I make.

This chair is about up for common use. The again leans 12° off the seat, and the seat is tilted 3°, so the again leans 15° off the ground. The seat is 16-3/4″ above the ground, which is a great peak for many sitters. Total, the chair is 38-1/2″ tall and there’s 19″ between the palms. 

Like any my chairs, the joints are assembled with cover glue and oak wedges, so the joints are robust however will also be simply repaired by way of long run generations. The pink oak is done with a home-cooked linseed oil/wax end that has no toxic solvents. The end provides low coverage, however it’s simple to fix by way of the landlord without a particular abilities or gear.

As to the beauty defects: Some of the tenons within the seat has a small little bit of chip-out. Additionally, I needed to ream fairly one of the crucial mortises within the underside of the armbow. You’ll by no means understand this except you flip the chair the wrong way up. Neither of the defects have an effect on the chair’s construction or convenience. 

Buying the Chair

This chair is $1,200 and is being bought by the use of a drawing. (I’m sorry however the chair can’t be shipped out of doors the U.S.) If you want to purchase the chair, ship an e mail to [email protected] earlier than 3 p.m. (Japanese) on Friday, Jan. 27. Within the e mail please use the topic line “Red Oak Chair Sale” and come with your:

  • First title and ultimate title
  • U.S. transport cope with
  • Sunlight hours telephone quantity (that is for the trucking quote simplest)

Transport choices: You might be welcome to select up the chair right here in Covington, Ky., and in addition get a loose yardstick and pencil. I’m glad to ship the chair in my view without spending a dime inside of 100 miles of Cincinnati, Ohio. Or we will send it to you by the use of LTL. The fee varies (particularly at the present time), however it’s normally between $200 and $500.

— Christopher Schwarz

Video: Rotating wings on the butterfly table

Video: Rotating wings on the butterfly table

Here’s the Butterfly Table that I’ve been reproducing. After running the rule joints, I assembled all the parts. I incorporated the rotating wings as proven however they don’t seem to be fastened but. There are dowel joints at each and every finish of the wings and the ones joints don’t seem to be glued. Due to this fact, I will elevate and decrease the wings at this level. Alternatively, they want to be fastened ready that may lead to the wings conserving the drop leaves at the right kind top (this is, the place the wings are flat with the middle best). Additionally, I sought after a solution to accommodate a long run repair for the doweled wing joints. If a dowel had been to damage (now not so most probably, as they’re ash), I sought after some way to take away the wings and refit the dowel joints.

Tim Killen's 17th century butterfly table

Here’s a image with the wings set at a top to create a flat floor throughout the span of the best. But, I nonetheless want a option to repair the ones wings at this optimum top. You’ll see a part of the decrease dowel because it enters the decrease stretcher on the proper. The wing itself does now not trip on the best fringe of the stretcher, reasonably it’s raised off the floor. That is the method it’s on the unique piece. So, I now want to get a hold of a solution to repair this place but permit a long run repair if vital.

Tim Killen's 17th century butterfly table

Here’s the meeting the wrong way up so you’ll be able to see the sockets in the block and the decrease stretcher.

Tim Killen's 17th century butterfly table

Underneath, I’ve proven the wing pressed down on the underside floor of the best leaf.  Then I drove a dowel down via the socket in the decrease stretcher. That socket is a “via” socket. The dowel used to be hammered down till it bottomed out in the wing’s socket. Then I lower the dowel flush with the backside floor of the decrease stretcher. I made a brass plate that covers the socket and dowel-end solving the wing’s up-down place and fighting the wing from losing down.

Tim Killen's 17th century butterfly table

Tim

KillenWOOD


Router Sitter | Popular Woodworking

Router Sitter | Popular Woodworking

We would possibly obtain a fee while you use our associate hyperlinks. On the other hand, this doesn’t have an effect on our suggestions.

I don’t like to put my router on its aspect with the bit uncovered, so I constructed a stand for it. It’s only a 3/4″ x 8″ x 8″ board with a 2″ dia. hollow within the heart. The board sits on 2″ tall legs. I added shelf liner to the highest of the stand to stay the router from sliding. –Serge Duclos


Product Suggestions

Listed below are some provides and equipment we discover very important in our on a regular basis paintings across the store. We would possibly obtain a fee from gross sales referred via our hyperlinks; then again, we have now sparsely decided on those merchandise for his or her usefulness and high quality.

Workshop tip: Repurposed hardware containers

Workshop tip: Repurposed hardware containers

Like many woodworkers, I recycle plastic containers for hardware garage. This labeling trick shall we me clutch the correct container off the shelf each time. It’s not anything greater than a pattern of the hardware within—screw, bolt, or no matter— taped to the outdoor, with the scale and sort famous at the tape.

—CHARLES MAK, Calgary, Alta., Canada

Illustrations by means of Dan Thornton
From Positive Woodworking factor #301


Brush Care 101 | Popular Woodworking

Brush Care 101 | Popular Woodworking

Brush Care 1012023-01-20Popular Woodworking//www.popularwoodworking.com/wp-content/uploads/2020/09/aw_15750_001.jpg200px200px

We might obtain a fee whilst you use our associate hyperlinks. Then again, this doesn’t have an effect on our suggestions.

How to select, situation, and blank a completing brush.

It’s in reality tempting to shop for an affordable brush for completing.


<br />


Via registering, I recognize and conform to Lively Hobby Media’s (AIM) Phrases of Provider and to AIM’s use of my touch data to keep in touch with me about AIM, its manufacturers or its third-party companions’ merchandise, services and products, occasions and analysis alternatives. AIM’s use of the tips I supply shall be in line with the AIM Privateness Coverage.


‘Stanley Tools Catalogue No. 34’ Closeout – Lost Art Press

‘Stanley Tools Catalogue No. 34’ Closeout – Lost Art Press

We’re ultimate out our reprint of the “Stanley Tools Catalogue No. 34,” and are promoting last copies for $10 every, merely to disencumber area at the warehouse cabinets. Each and every acquire comes with a loose PDF replica – as soon as the 450 (or so) print copies are offered out, we’ll proceed to supply a loose PDF of the 1914 catalogue right here at the weblog.

This catalog presentations just about each and every software wanted in a hand-tool store 100 years in the past, from the chisels to the butt gauges to each and every kind of aircraft within the corporate’s line. The textual content explains what every one is used for and the way it purposes in a different way from different equivalent gear.

The catalog additionally has implausible exploded perspectives of most of the advanced gear, corresponding to Stanley’s miter bins, the multi-planes and handplanes. It’s an excellent useful resource to have available at a device meet or vintage marketplace – now not simplest to spot antique gear, however to peer if all of the portions are intact.

If you’re simply entering hand gear, we predict you’ll to find this catalog a pleasure to learn, hang and be informed from. The tips in it’s factual and easy – now not the puffery you get from many trendy catalogs. And should you gather or admire antique hand gear, we predict you’ll love this catalog, which reproduces the antique drawings with outstanding readability.

As soon as those are long past, we don’t seem to be reprinting. So get it now or endlessly hang your (Harvey) peace.

Fitz

The Chairmaker’s Toolbox – FineWoodworking

The Chairmaker’s Toolbox – FineWoodworking

How did you get into woodworking?

The majority of other people I meet have made a option to pursue woodworking. I regularly in finding woodworking beginning tales aren’t easy; neither is mine. In case your option to delve into the business, the craft, or the gear equipped any demanding situations alongside the way in which, you may well be excited about giving again to the group you’re part of. There’s one woodworking group I am keen on as it in particular celebrates woodworkers that may no longer really feel secure in widespread woodworking areas.

The Chairmaker’s Toolbox (CMT) transforms custom. It celebrates teaching new generations of craftspeople that experience felt driven away or unwelcome. It supplies training in each study room shape and thru gear themselves. You’ll be able to donate cash or gear in sort and every shall be used to toughen a rising group of makers. Possibly you’ve got a selection of gear sitting at the hours of darkness which may be useful to somebody intending to start.

I’m extremely joyful by way of the chance of celebrating new generations of woodworkers. Let’s face it: woodworking can also be dear and tough to get admission to. My revel in in woodworking unfortunately comprises forcing my means into areas that weren’t precisely welcoming. As unpleasant because the tales is also, the mentality in the back of them nonetheless informs many seasoned woodworkers nowadays. The Chairmaker’s Toolbox avoids heartache tales for different novices excited about studying woodworking. CMT gives investment to woodworkers which have been traditionally underrepresented. Reasonably than pushing other people away, the Chairmaker’s Toolbox welcomes them in.

How are you able to have the same opinion?

To donate to the CMT project, seek advice from the web page right here:
https://www.thechairmakerstoolbox.com/donate

To be told in regards to the gear or observe for gear, take a look at the CMT challenge right here: https://www.thechairmakerstoolbox.com/the-gear